Orthopeadic implants have improved the quality of life for countless patients. It has been widely reported of the decrease in average age of patients receiving implants. This creates a pressure for orthopedic manufacturers to keep up with demand for safe implant components. Using advanced metrology solutions for orthopeadic implant measurement can create a lot of benefits for a manufacturing company, as well as the patient.
The result of this greater demand and age variance is cutting-edge products that are transformational for patients, but that also complicates manufacturing and quality processes. These complications can increase safety and product quality risks, while also impacting compliance, market reputation, and profitability. This reality brings the business benefits of orthopaedic implant metrology and inspection solutions into sharp focus. We’ll explore these business benefits in this blog.
We’ll also look at the challenges of quality control and product inspections when manufacturing orthopaedic implants, as well as the technologies and automation solutions that ensure accurate, reliable, and repeatable inspections.
Real-World Examples of Business Benefits from Advanced Metrology Solutions
At Verus Metrology Partners, we develop metrology and inspection solutions for orthopaedic implant medical device companies and contract manufacturers. Therefore, we have direct experience of the business benefits that can be achieved. Here are some examples:
Increased Component Through-put
One of our clients produces spinal implants. We developed a fixture solution that enabled 90 parts to be inspected in one setup, significantly reducing operator involvement in the inspection process. Inspection accuracy was also improved, and the solution made it possible for more parts to be inspected faster than before.
Furthermore, the fixture was designed to accommodate spinal implants of various sizes without causing any damage to the product during the inspection procedure.
Improved Safety Through Patient-Specific Hip Implant Inspection
We developed an inspection solution for a client that produces patient-specific hip implants. In other words, all the hip implants they produce are different shapes and sizes. The fixture solution we designed securely holds the implants in place, while facilitating over 1,000 variant component inspections.
The business benefits of this solution for our customer were significant, as the quality control process was enhanced to a level that couldn’t be viably replicated by manual inspection processes. Operator involvement was also minimised, accuracy levels improved, and the inspections were repeatable, despite the product being a patient-specific implant.
Maintaining Strong Reputation
This Verus client produces an implant product that has both a left and right variation. As part of its distribution and quality control process, the product is inspected by five different operators to ensure the correct left or right version is delivered to the hospital. Despite this resource-intensive process, there are still instances where surgeons have to cancel surgeries at the last minute because a left implant has been sent instead of a right one, or vice versa.
Our inspection solution automates the process and eliminates the errors that all operators will inevitably make, ensuring surgeons have the correct left or right implant for the surgery about to be performed.
The benefits of this inspection solution include enhanced customer relationships, protected brand reputation, and reduced costs as a result of rejected products. However, the benefits go far beyond benefits to the business, as patients also benefit as they no longer have to suffer the considerable inconvenience of having an implant surgery cancelled at the last minute because of a process error at the manufacturer.
The Challenges of Quality Control and Inspection of Orthopaedic Implants
Modern orthopaedic implants often have highly complex geometries with tight tolerances. The materials used to manufacture implants are also a factor, especially with the growing use of polymers and other non-metallic materials.
A lot of orthopaedic implant products, including joint implants, also need surface properties that are nothing short of perfect. We can take roughness as an example. An implant manufactured with a surface that has roughness levels higher than specified increases the risk of microorganisms forming on the implant. This is one of the reasons why tolerances are extremely tight on implants, but it is also possible to go too far in the manufacturing process. For example, polishing the surface beyond the defined tolerance and potentially reducing the service life of the implant.
As a result, there is an important balance to be struck. After all, orthopaedic implants involve invasive surgery that comes with multiple risks, making it even more important that patients benefit from the implant for as long as possible.
How do you know you have achieved the right balance in relation to surface roughness? How can you be sure the orthopaedic implants you manufacture (or are produced by your contract manufacturing partner) are within the defined GD&T tolerance ranges, i.e., length, diameter, position, shape, etc?
Advanced metrology and inspection solutions are the answer.
Metrology and Inspection Capabilities for Orthopaedic Implant Products
Careful consideration is required to develop metrology and inspection solutions for orthopaedic implants, especially if the product is a patient-specific implant. The solution needs to be non-contact and non-destructive, and it needs to be accurate, reliable, and repeatable.
The solution must also deliver a return on investment whether it involves process control, geometric dimensioning, surface analysis, or all three.
There are three main components that make up an advanced metrology solution for orthopaedic implant products:
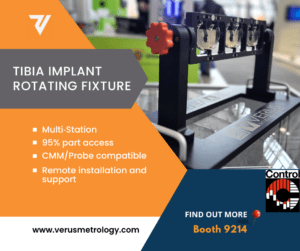
- Metrology fixture – to hold the implant (or multiple implants) securely in place during the inspection routine. Various options and features are possible, including fixtures that hold multiple components at once, rotational fixtures, automation features, and features that enable the inspection of multiple component variants.
- Inspection machine – an inspection machine that is capable of non-contact geometric dimensioning and tolerancing as well as surface analysis.
- Inspection routine – the software program that brings together the product, fixture, and inspection machine.
With modern technologies, it is possible to develop metrology solutions that enable the inspection of implants and components manufactured from a range of materials, including polymers and metals. It is also possible to inspect implants produced using additive manufacturing technologies.
Orthopaedic Implant Inspection Capabilities
Modern metrology solutions can complete a wide range of inspections on orthopaedic implant products. Examples include:
- Form deviations and shape.
- Dimensions, including lengths and diameters.
- Positioning, including positional measurements of very small components with single digit µm tolerances.
- Roughness outside of specified tolerances.
- Packaging, including seals.
- Label accuracy.
Further Business Benefits of Advanced Metrology Solutions for Orthopaedic Implants
- Quality – you can improve the quality and reliability of your products as there is less risk of a non-conforming product being released into the market. You can also use information from inspections to improve your manufacturing processes, minimising the production of non-conforming products and delivering efficiency savings over the long term.
- Human error – even well-trained and experienced operators make errors. By automating large parts of the inspection process, you will reduce the risk of human error.
- Patient safety – higher quality products produced within defined tolerances will improve patient safety.
- Compliance – compliance processes for your orthopaedic implant products will become more efficient, plus you can have greater confidence in the accuracy and reliability of inspection processes.
- Service life – better quality products produced within the defined tolerance ranges enhance the service life of orthopaedic implants.
- Competitiveness – if you are a medical device company, improving the quality and safety of your implants will improve the competitiveness of your product offering. If you are a contract manufacturer, you will improve the service you offer to clients.
- Customer service – you can enhance levels of customer service by reducing rejected products and ensuring consistent product quality.
- Efficiency and staffing – advanced metrology solutions improve efficiency, plus they reduce your reliance on operators.
- Returns and profitability – the benefits outlined above will deliver a rapid return on investment and improved profitability.
Our Capabilities at Verus
At Verus Metrology Partners, we manufacture customised and highly specialised fixtures for orthopaedic implant inspection processes. We can also advise on the right inspection machine for your application, and we can program the inspection routine as well as installing and commissioning the solution at your facility.
We work with orthopaedic implant medical device companies as well as contract manufacturers, plus our fixtures and wider metrology solutions are used in facilities around the world.
We also have extensive experience in the industry. This last point is important as developing an inspection solution for orthopaedic implants, particularly patient-specific implants, is very different from developing an inspection solution for a medical device product produced in high volumes on high-speed production lines.
Careful consideration needs to be given to the materials used in the manufacture of your product, how the components are connected and positioned, and the various geometries and shapes. It is also essential to consider the variations that occur as the product is customised to ensure the solution, including the fixture, machine, and software, can reliably and repeatably inspect every customised implant you produce.
To find out more and to calculate return on investment timescales for your requirements, get in touch with us today.
